Can you tell me about A guide to uploading images to Cloudinary via API using Kodular (without using Cloudinary Extension) using multipart/form-data HTTP POST via Kodular Web Component.
can you follow this?
When ButtonUpload.Click do:
Call ImagePicker1.PickImage
When ImagePicker1.AfterPicking do:
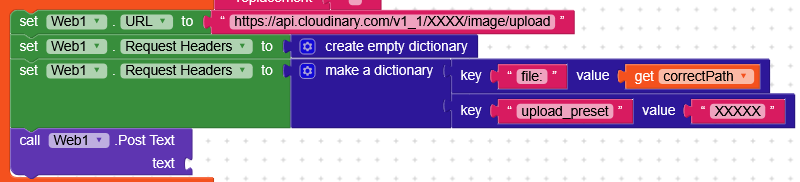
Set Web1.Url to "https://api.cloudinary.com/v1_1/<cloud_name>/image/upload"
Set Web1.RequestHeaders to create empty dictionary
Set Web1.RequestBody to create dictionary with:
"file": ImagePicker1.ImagePath
"upload_preset": "<your_upload_preset>"
"api_key": "<your_api_key>"
Call Web1.PostText
When Web1.GotText do:
If Web1.ResponseCode = 200 then
Set jsonResponse to Web1.ResponseContent
Set uploadURL to get "url" from jsonResponse (use the `JSONTextDecode` block)
Set LabelStatus.Text to "Upload successful! Image URL: " + uploadURL
Else:
Set LabelStatus.Text to "Upload failed! Error: " + Web1.ResponseContent
How to Set Up an Upload Preset in Cloudinary:
- Go to Cloudinary’s Dashboard:
- Log in to your Cloudinary account.
- Navigate to Upload Settings:
- On the left sidebar, click on “Settings”.
- Go to the Upload tab.
- Create a New Upload Preset:
- Scroll down to Upload Presets and click on the Add Upload Preset button.
- You will be prompted to configure the preset. You can leave most options as they are or customize them based on your requirements, like allowed file types, image transformation settings, and more.
- Set the Preset Type:
- Ensure the preset is set to “Unsigned” (as you’re not using an API secret).
- Save the Preset:
- After setting up your preset, save it, and you’ll be given the upload preset name (this is the value that you will use in your Kodular project).
Note: You should use the same namespace in the dictionary mode
1 Like
Unable to find Web1.RequestBody in web1 block
Request headers was mistyped as body

Thanks, will save and do at some later time. currently I’ve been moved to Firebase storage, it offers upto 5GB of free space in Blaze plan.
what to attach in PostText method? Have you generated above code with Ai? Have you tried this yourself?
No no no no no![]()
![]()
What’s exactly going on ![]()
Am off![]()
Sorry, I’m just reading the original question
As the web component does not support multipart/form-data it will not work like this
Try one of the following extensions
-
HttpUtil Extension by kevinkun, Post a html form with enctype set to multipart/form-data
-
Async HTTP Extension with Multipart/Form-Data Support for Imgur Image Upload by Passos_0213
-
ApiUtils Extension by SyntaxCore to enable multipart/formdata integration and file uploads
Taken from the extensions directory App Inventor Extensions | Pura Vida Apps
Taifun
2 Likes
As of now, these 3 extension does worked to upload media on cloudinary
finally made it work with ApiUtils Extension
I made it work using ApiUtil Extensions ApiUtils | Multipart/form-data Integration and File Uploads Made By Glich
replace the CLOUD_NAME and PRESET_NAME with you details. Also you can add API and Secret in formData dictionary.
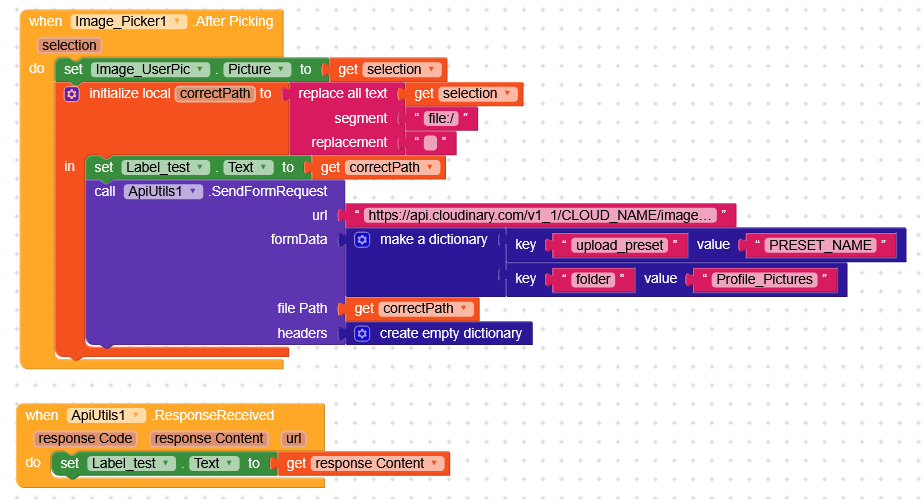
Thanks to @Taifun for suggesting the extension ![]()
3 Likes