How to store Data in Google Sheet From Spinner

Today In this Tutorial I will show you how to Store Data in Google Sheet Data from Spinner.

First Step
  1. First Of All, Open Google Sheet.

  2. Then Create a New Spreadsheet, by clicking on this button.

  3. Then, Give a name to Spreadsheet, by clicking on upper left side button.

  4. Then, Click on a Tool tab and then click on Create a Form.

Second Step
  1. This type of page will be appear in your screen.


    I am using Mobile, May be there was a some difference.

  2. I used 3 Spinner in My App. Company, Category & Model.


    So, Now we make 3 Spinner in Google Sheet also.

  3. Change Name Untitled Question to ‘Company’.


    Like this.

  4. After Changing the Name of Untitled Question to ‘Company’. You can see this type of option.

  5. We are using Spinner. So, we will Choose Drop-down Option.

  6. After Choosing Drop-down, we will click on Option 1 and Change Name to Item(Name the item you want to put in the spinner).


    Add Item in Company One by One, Like Above :point_up_2::point_up_2:

I added 3 Items You Can Add as much as you need.


If this Category was required for users. Then, checked it to Required Else Not.

  1. Now we Completed One Category(Company).
    Like this we we will make rest of Categories and Add items.

  2. To make New Category we will click on this button.


    You can find this button at the left side of Screen.

  3. After Making All Categories and Adding Items. We will click on More Option(3 dot) & Click on details Get pre-filled link Button.

Third Step
  1. When we click on Get pre-filled link. It show like this.

  2. Then Choose Any Item From this(For test).

  3. Then Click on ‘Get link’ Button, & Copy that link.


& Paste it in Notepad Or Any safe Place.

  1. Then, Copy current Url also & Paste this link also in Notepad Or Any safe Place.

  2. Your both link will be like this.

  3. Now we will come in Google Sheet. It will be like this.

  4. Now, Our work was Completed in Google Sheet. Now, We will go in Kodular.

Fourth Step
  1. In Kodular I have Screen Like this.


    And we will Add Button Also.

  2. Now we will Add items in Categories(Spinner) as same as we added in Google Sheet.

  3. Then we drag web component and drop on screen. Now, Our work was completed in Design(Layout) Section. So, Now we will go in Blocks Section.

  4. So, Now start with blocks.
    When Button1 Click, If Spinner1 Selection is not equal to empty or Spinner2 Selection is not equal to empty and so on.
    Then, Set Web1 Url to join(use join block).
    In,
    1st String we will add copied Url, we had copied 2 url. So, First we take this Url https://docs.google.com/forms/d/1fBycwoQfY5rjQPLhV9CqCE18mhZCieHbXuu2nEHK8FI/prefill
    Which ends with prefill. So we erase prefill and write ‘formResponse’
    So, Now our url will be like this.

Guide For Kodular Community
Now, Copy this Url and paste in 1st string
Please don’t do any type of mistake in Url otherwise it not work.

Now, we take second Url.
Guide For Kodular Community
From this Url We have to search entry. We used 3 Spinner in Our App. So, in Url there was 3 entry.
So, first we copy first entry with number and =. Like this. entry.958363812= and Paste this Url in 2nd String but we add ? at first. So, our 2nd String will be like this. ?entry.958363812=

In 3rd String We take Spinner 1 Selection.
In 4th String We take 2nd entry from above Url. But in second entry at first we add &. So, it will be like this. &entry.492904808=
In 5th String We take spinner 2 Selection.
In 6th String We take 3rd entry from above Url. But in third entry at first we add &. So, it will be like this. &entry.916812303=
In 7th String we take Spinner 3 Selection.

Please don’t use my URL.

  1. Now, we Completed If, then but you want to show alert or anything, You should use else.
    & If you want to show the data was stored or not. So, see Fifth Step.
Fifth Step
  1. If you want to show the data was stored in Google Sheet or Not.
  2. Use Web1 Got text block.
  3. If, Global Response code = 200. Then, Show Alert, Notice, Data was registered. Else Data was not registered.
    Like this.
    IMG-20210101-WA0021
9 Likes

really thanks broo
i was looking for this last year

1 Like

Thanks @Ekansh_Pandit If you need any help regarding Google Sheet. You can ask me here Or PM me.

I removed your polls. If you want to be taken seriously about your guide, it will speak for itself.

2 Likes

Nice guide. It will help many Koders.

1 Like

Thanks @golumaths100

1 Like

@Peter I am not doing fun with Polls. I delete my first Polls Because I made multiple choice in Poll. So, I make the new poll.

@Peter I made a guide but I didn’t get any badges.
Why? Any reason?

Not working for me … As I mention data is already in sheet with formulas…

I just want dependable selection and its respective values should be viewed …

Yes, not working for me also…

you made this guide for just a badge?

1 Like

Great Work App
Badge doesn’t matter but you get motivation when you get some reward.

3 Likes

Thank you for this tutorial.
A don´t understand Fourth Step…
Could you write an full example with URL and layout of Blocks?

Thank you again.

hi @Javier_Grana the creator of this guide is suspended so probably you cant get any support or maybe people who has followed this guide and succeeded could help you
Thanks,
@luv.ak.tech

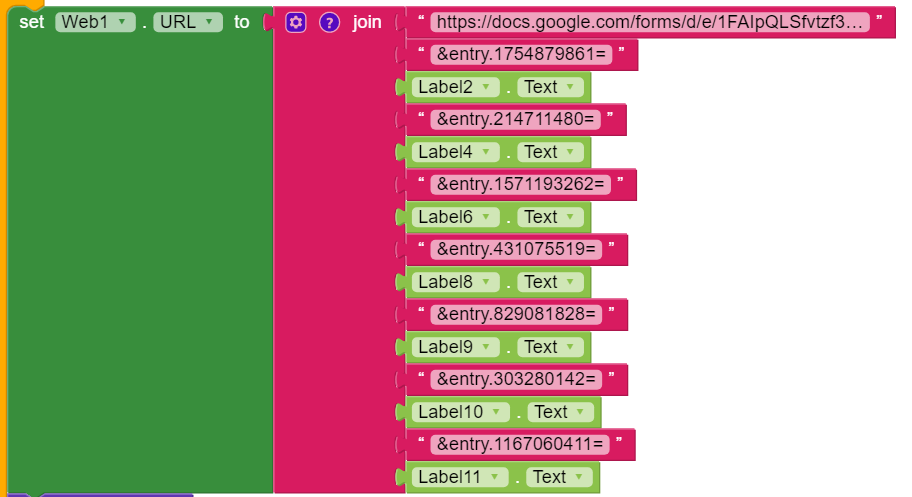
See a similar example. Basic url is

https://docs.google.com/forms/d/e/your_spredsheet_id/formResponse?

joined with entries in form

1 Like

somewone give me a example aia i need something like this
id table
https://docs.google.com/spreadsheets/d/1cerce7mOznwjYIqv527ZFFQF98hwbHX0xj2IXWrl6o0/edit#gid=0

if this need google script here (maybe code not work)
https://script.google.com/home/projects/113_Lz7YnNiu1QAWkcCp11DT3v7WMNVepeqnCbLa0PD9iiUlcutA1Xxht/edit