Asalamualaikum,
hello guys, here i’ll give you’ll tutorial “How To Add Google Translate Plug-in On Your Project”. Before It, reason why i make this tutorial, maybe 'cause This One
and I really apologize for the messy writing on the post, so that someone doesn’t understand it. okay so the problem is how to add Google Translate Pugin on our android project. Actually in that post I mentioned that “it’s just an html document”, and because of that this tutorial will help you if you use an html document on your android project. okey lets start,
1. How to Get Google Translate Pulg-in
Actually you just need to add google Translate Javascript into your HTML Document, but How to get this code? Visit this site, follow step given and you’ll get It,
Here you’ll get 3 style; Vertiacal, Horizontal, and dropdown only. I recomended you to choose "dropdown only, why? i’ll explain it on next
before it, if you wont visit this site and you want use my recomendation option style of This Plug-in you can use this code
<div id="google_translate_element"></div><script>
function googleTranslateElementInit() {
new google.translate.TranslateElement({
pageLanguage: 'id', layout: google.translate.TranslateElement.InlineLayout.SIMPLE, },
'google_translate_element');
}
</script>
<script
src="http://translate.google.com/translate_a/element.js?cb=googleTranslateElementInit"></script>
Look at this code " pageLanguage: ‘id’ ", its your default page language. So change it with your language code (given below)
2. How To Custom It
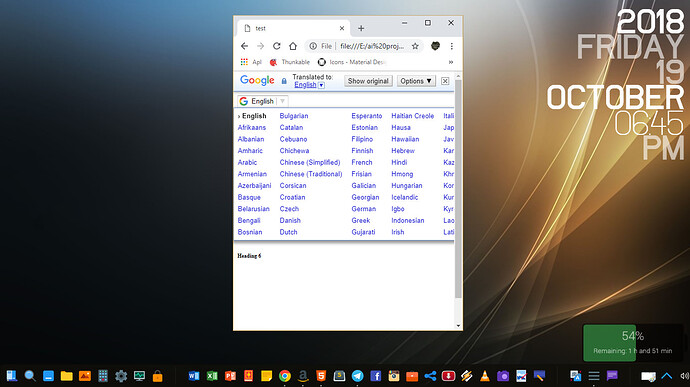
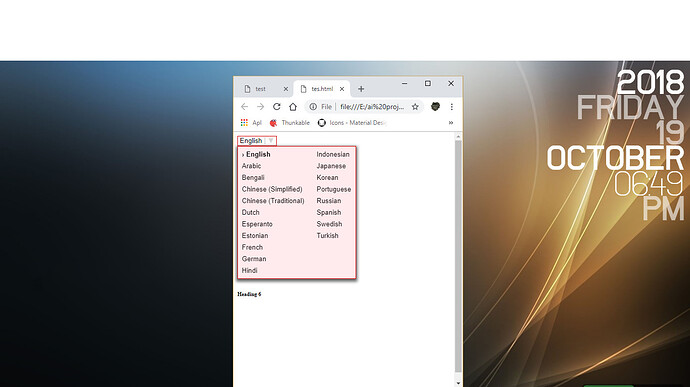
why i customize it? Look at this Pict,
first Image
Second Image
Which looks better? Second image? Why? this is my reason, if you don’t customize it you will get an unresponsive design, top iframe or Google translate container (look at picture given). so if you want to do the same thing, you can follow this step or else you can directly add the Google Translate Javascript code that I gave you earlier (in the first step).
2.A. Add custom Jquery
Add this code after Head Tag and before skin tag on your html document:
src="https://ajax.googleapis.com/ajax/libs/jquery/3.3.1/jquery.min.js"></script>
Then after it, add this code after Google translate javasript code:
$('document').ready(function () {
$('#google_translate_element').on("click", function () {
// Change font family and color
$("iframe").contents().find(".goog-te-menu2-item div, .goog-te-menu2-item:link div, .goog-te-menu2-item:visited div, .goog-te-menu2-item:active div") //, .goog-te-menu2 *
.css({'color': '#000000', 'background-color': '#ffebee', 'font-family': '"Open Sans",Helvetica,Arial,sans-serif'});
// Change hover effects #d50000 = red
$("iframe").contents().find(".goog-te-menu2-item div").hover(function () {
$(this).css('background-color', '#d50000').find('span.text').css('color', '#ffffff');
}, function () {
$(this).css('background-color', '#ffebee').find('span.text').css('color', '#000000');
});
// Change Google's default blue border
$("iframe").contents().find('.goog-te-menu2').css('border', '1px solid #d50000');
$("iframe").contents().find('.goog-te-menu2').css('background-color', '#ffebee');
// Change the iframe's box shadow
$(".goog-te-menu-frame").css({
'-moz-box-shadow': '0 3px 8px 2px #666666',
'-webkit-box-shadow': '0 3px 8px 2px #666',
'box-shadow': '0 3px 8px 2px #666'
});
});
});
</script>
Actually not all of the code works depending on the browser being used, so you can remove code that doesn’t work
2.B. Add Custom Css
Add this css on your HTML skin or style Tag
#google_translate_element{position: realitve; top: 9px; right: 5px;}
.goog-te-gadget{font-size: 12px !important; font-color: white !important;}
.goog-te-gadget-simple{background-color: white !important; border-color: #d50000 !important;}
//Remove Google Logo//
.goog-te-gadget-icon{display:none !important;}
.goog-te-gadget-icon_inline{padding-top: 8px; max-height: 0; overflow: hidden; position: absolute; top: 110%; left: 0px; -webkit-transition: all 0.25s ease-in-out; transition: all 0.25s ease-in-out; width: 135px; text-align: right; padding-top: 0; z-index:500;}
#google_translate_element img {display: transparent !important;}
//change color hover//
#google_translate_element span:hover {background: #d50000 !important; color: #ffffff !important;}
//remove to frame//
.goog-te-banner-frame.skiptranslate {display: none !important;}
body {top: 0px !important;}
/background: url(“url for the icon”) 0 0 no-repeat !important;/
}
/* Remove the down arrow /
/ when dropdown open /
div#google_translate_element div.goog-te-gadget-simple a.goog-te-menu-value span[style=“color: rgb(0, 0, 0);”] {
display: transparent;
}
/ after clicked/touched /
div#google_translate_element div.goog-te-gadget-simple a.goog-te-menu-value span[style=“color: rgb(0, 0, 0);”] {
display: transparent;
}
/ on page load (not yet touched or clicked) /
div#google_translate_element div.goog-te-gadget-simple a.goog-te-menu-value span[style=“color: rgb(0, 0, 0);”] {
display: transparent;
}
/ Remove span with left border line | (next to the arrow) in Chrome & Firefox /
div#google_translate_element div.goog-te-gadget-simple a.goog-te-menu-value span[style=“border-left: 1px solid rgb(213, 0, 0);”] {
display: transparent;
}
/ Remove span with left border line | (next to the arrow) in Edge & IE11 */
div#google_translate_element div.goog-te-gadget-simple a.goog-te-menu-value span[style=“border-left-color: rgb(213, 0, 0); border-left-width: 1px; border-left-style: solid;”] {
display: transparent;
2.C. Add Some Language
Look at the picture, what’s different? Yep, the language displayed. In the first picture more languages are displayed, but the problem is that the design is not responsive. So here I only display a few choices of languages that I consider important.
actually we can add a javasript code so that in the google translate container a scroll bar will appear which can help all languages appear. But still it doesn’t make the design responsive, it just adds a scroll bar. And here I want to look attractive so that’s the reason why I only display a few language options so that the design looks responsive.
Add this code in the google translate plugin:
includedLanguages: ‘ar, bn, de, en, eo, es, et, fr, hi, id, ja, ko, nl, pt, ru, sv, tr, zh-CN, zh-TW’
So your google translate plugin will be looks like this:
<script>
function googleTranslateElementInit() {
new google.translate.TranslateElement({
pageLanguage: 'id', **includedLanguages: 'ar,bn,de,en,eo,es,et,fr,hi,id,ja,ko,nl,pt,ru,sv,tr,zh-CN,zh-TW',** layout: google.translate.TranslateElement.InlineLayout.SIMPLE, },
'google_translate_element');
}
</script>
<script
src="http://translate.google.com/translate_a/element.js?cb=googleTranslateElementInit"></script>
How about if we want to add another language? and how about the language codes? Look below
| Language Name | Code | Language Name | Language Code |
| Afrikaans | af | Irish | ga |
| Albanian | sq | Italian | it |
| Arabic | ar | Japanese | ja |
| Azerbaijani | az | Kannada | kn |
| Basque | eu | Korean | ko |
| Bengali | bn | Latin | la |
| Belarusian | be | Latvian | lv |
| Bulgarian | bg | Lithuanian | lt |
| Catalan | ca | Macedonian | mk |
| Chinese Simplified | zh-CN | Malay | ms |
| Chinese Traditional | zh-TW | Maltese | mt |
| Croatian | hr | Norwegian | no |
| Czech | cs | Persian | fa |
| Danish | da | Polish | pl |
| Dutch | nl | Portuguese | pt |
| English | en | Romanian | ro |
| Esperanto | eo | Russian | ru |
| Estonian | et | Serbian | sr |
| Filipino | tl | Slovak | sk |
| Finnish | fi | Slovenian | sl |
| French | fr | Spanish | es |
| Galician | gl | Swahili | sw |
| Georgian | ka | Swedish | sv |
| German | de | Tamil | ta |
| Greek | el | Telugu | te |
| Gujarati | gu | Thai | th |
| Haitian Creole | ht | Turkish | tr |
| Hebrew | iw | Ukrainian | uk |
| Hindi | hi | Urdu | ur |
| Hungarian | hu | Vietnamese | vi |
| Icelandic | is | Welsh | cy |
| Indonesian | id | Yiddish | yi |
3. Finish, save your HTML Document and upload it as your asset.
actually I don’t want to remove the google logo on the plugin because this isn’t a commendable act, but I’m just a human who wants to look cool so I do it.
and lastly, I hope this tutorial is useful for you and DWYOR.
happy coding…

