Can any one tell how to upload pdf files from our android device to firebase storage using makeroid or thunkable app ?? Please try to solve this issue as soon as possible.
I also have kissanime the same question and letgo i need solutions here. Help is appreciated.
Regards,
Shane.
But we cannot upload pdf using it.
It’s true… that extension is only for photos…
You can upload any type of file using firestore APIs…
You can see the documentation here
Basically what this API does is give a url address so we can upload the files through it. To use it in app inventor (or Thunkable or Makeroid) we have to create that address by joining text strings.
A good way to get the url is to go to Storage and upload a file and then click on it and in the file properties you will see the download link generated for that file.
We need to add the Web component. And use the one that says “web1.url”
For example if the url of the uploaded file is:
If you look at the url you will see that it has the stocking and the token (all that is after the sign “?”). That’s not necessary. So everything that is after the ? is not necessary to put it.
First create the address and then the headers, which contain the MIME or type of file to upload (image/jpeg, text/csv, text/plain, video/mpeg, etc.).
Important:
To create directories you simply give it a directory name and if it doesn’t exist, create it. Keep in mind that the syntax for directories is as follows:
/DirectoryName%2F
Next to it must be the name of the file (without spaces). Note that %2F is a special character corresponding to the / symbol.
Finally, with the Post File block you upload the file you want, indicating the path to that file. This path can be fixed or taken from the result of some Picker or activity starter…
Something like it is shown in the image (that project doesn’t exist anymore…):

To download, I think I remember, that you use the same procedure but in the Web Component you use the GET
Sorry for my English. I´m from Spain…
May you please provide the aia file to select and upload pdf firestore?
I followed the instructions from the mirxtrem tutorial on YouTube

Explanation begins at minute 3:30
It’s in Spanish. But if I can understand tutorials in English I think you can find out how it works… 
I’m sorry but I don’t have any aia file, I don’t have that firebase account anymore and I deleted that project a long time ago…
I am unable to understand. May you please make an aia for me. I will provide my firebase api.
First of all, I apologize for my bad English. I’m using a translator (DeepL)
To do that you say first you should go to your storage and upload a file and pass me the link to that file.
And you should also change the rules so that these files can be uploaded.
If I pass you an aia file you won’t see all that. And you will only see the blocks of two buttons and an Activity Starter.
And you won’t understand how it works.
I did a step-by-step tutorial with a test project (which I will delete shortly).
1) First we create a project, we already know that.
2) Then we must establish the rules so that everyone can upload files. I made them public, and it works. If you want to give special permissions to users you should read the documentation because I don’t know…

This are the Rules:
// Anyone can read or write to the bucket, even non-users of your app.
// Because it is shared with Google App Engine, this will also make
// files uploaded via GAE public.
service firebase.storage {
match /b/{bucket}/o {
match /{allPaths=**} {
allow read, write;
}
}
}
You just have to delete what’s in that box and paste these here (they are taken from the documentation, as you can see for yourself).
You can get more information from Get Started with Storage Security Rules | Firebase
3) Then it is convenient to upload a file to know what is the structure of the link…
This we do the first time and helps us to build our link to upload files.

When we upload a file, if we click on it (in firebase storage, logically) will open a side panel on the right. The details of the file are shown there. At the bottom we have to copy the download url. You can paste it into the notebook.

4) The link will have the following structure:
https://firebasestorage.googleapis.com/v0/b/test-6bc01.appspot.com/o/Siddharta.pdf?alt=media&token=2bded1a4-ccbb-4d4e-8c06-d73ef9400495
If you look at the link you will see that there is a question mark (?)
Everything after that sign is not necessary, we will not use it. You can delete it.
Now the link will end with the name of the file you uploaded:
https://firebasestorage.googleapis.com/v0/b/test-6bc01.appspot.com/o/Siddharta.pdf
This link is the one that we will use to create a url that will be used for us to upload all the files that we want…
test-6bc01.appspot.com It´s the Bucket Storage. It is the same one that appears in the upper left part.

IMPORTANT:
obviously i do this example with a test project. You will have to place your url, with your project bucket and change your rules…
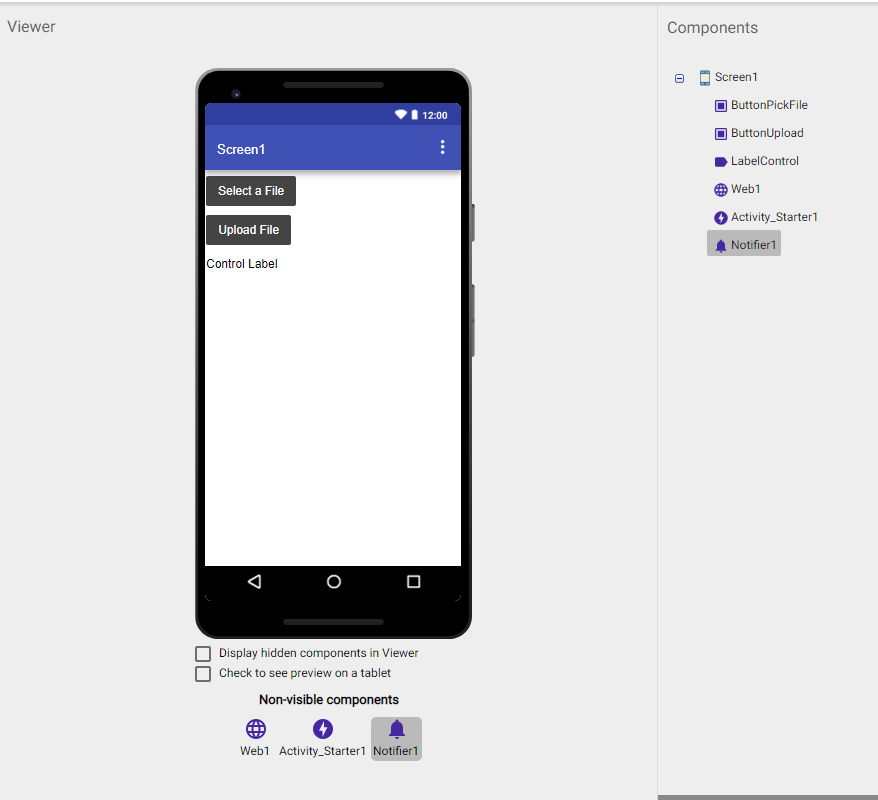
5) Now let’s go to Makeroid!
We will use:
A button to search the file (PDF)
A button to upload the file
(I use a Label to see some values… )
A Web component
An Activity_Starter
A Notifier
6) Here it doesn’t matter what block you start with.
First we will create a variable that will serve us to store the location of the file that we will select from our mobile.
We’ll call it: fileSource

7) Then we will make the blocks of the button that obtains the file from our telephone…

Where it says Data Type you have to put the type of data you want to upload. This is the MIME data type. In this case we use the one that corresponds to the PDF files (Application/PDF)
Here you can find a long list of these file types:
8) Then we’ll have to look inside the Activity_Starter blocks, one called “After.Activity”.
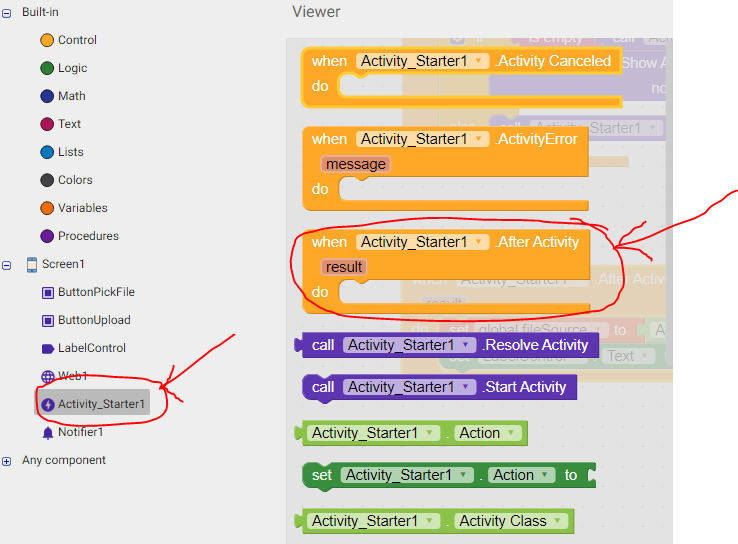
9) As you can see in the image what we do is assign to the fileSource variable the value that was obtained when we chose the file. I also put it in the label to know if everything went well …

10) Finally we create the blocks to upload the file obtained with the Activity Starter.
We will use 3 blocks that are inside the Web Component:
WEB1.URL
WEB1.Request Headers
WEB1.Post File
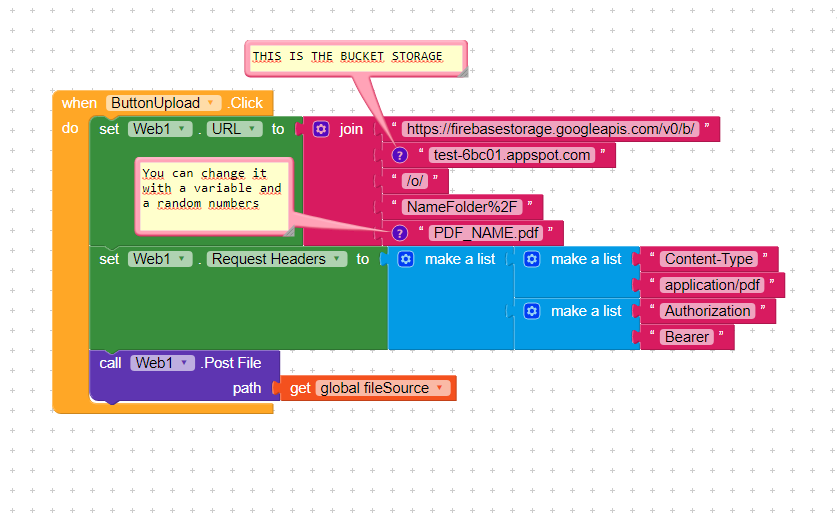
In this image above if you observe well, you will see that in the WEB1.URL block we are reconstructing the url of the file we uploaded.
https://firebasestorage.googleapis.com/v0/b/test-6bc01.appspot.com/o/Siddharta.pdf
Special attention must be given to the url syntax. A small typing error, a wrong symbol, and it won’t work
Here is the uploaded file and you can see how Firestorage created the folder

One thing to keep in mind:
To create directories you simply give it a directory name and if it doesn’t exist, firestorage creates it. Keep in mind that the syntax for directories is as follows:
FolderName%2F
Note that %2F is a special character corresponding to the / symbol.
The Request Headers block must go as it is in the image.
For files that are not PDF:
If the file to be uploaded is not a PDF, then where it says application/pdf we must put the type of MIME file it is.
You can see the list of MIME files I left above
For example:
image/gif, image/png, image/jpeg, image/bmp, image/webp, audio/midi, audio/mpeg, audio/webm, audio/ogg, audio/wav, application/octet-stream, application/pkcs12, application/vnd.mspowerpoint, application/xhtml+xml, application/xml, application/pdf
How to handle errors
The Activity Starter and the Web Component have a block that helps us to obtain the errors that have occurred.

And that’s it!
I just tried it with several files and it worked perfectly.
I hope it works for you and you can upload your files. If you follow the steps one by one I don’t think you have problems…
6 Likes
Hi, I did all the steps, but the link that is available in firebase is different, so I am not able to make the link to upload it. How can I solve?
It doesn’t really matter what the url looks like. The important thing is that you create it as it is. The only thing that varies is the name of the file. But then the whole structure has to be the same.

You must build the url with those blocks. You have to ensure that with the blocks Join you get the url as you have in your file.
1 Like

It works for me, but if upload fails how to know it in the process.
MIME types for .apk file (data type for andriod application in .apk format)
*don’t get anywhere