
Extension Overview:
The "PayPal Extension By @Black_Knight " is your entry point for incorporating PayPal’s strength into your Kodular applications. With the help of this dynamic plugin, the PayPal API may be easily accessed by your apps. Its clever construction makes it simple to retrieve access tokens using client credentials, bringing up a plethora of options for creating payment features.
 PayPal Extension for Kodular
A comprehensive PayPal integration extension for Kodular that enables one-time payments, recurring subscriptions, refunds, invoices, and more - all with a simple, easy-to-use interface.
![]()
![]()
![]()
blocks
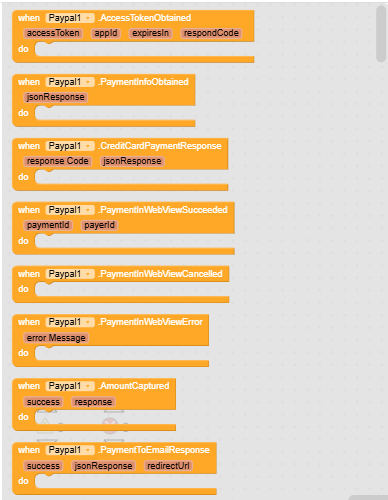
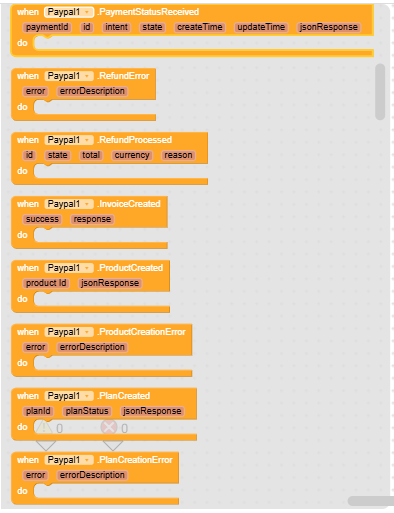
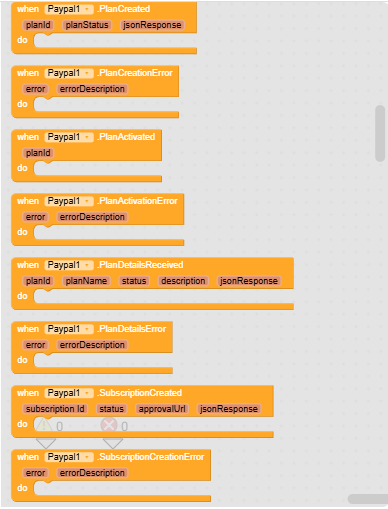
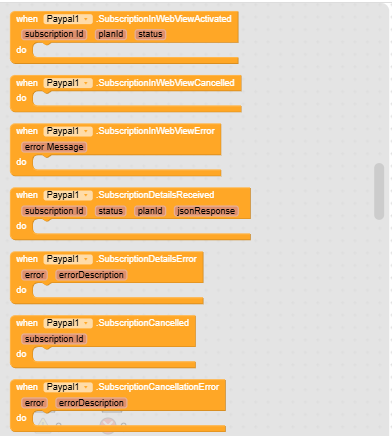
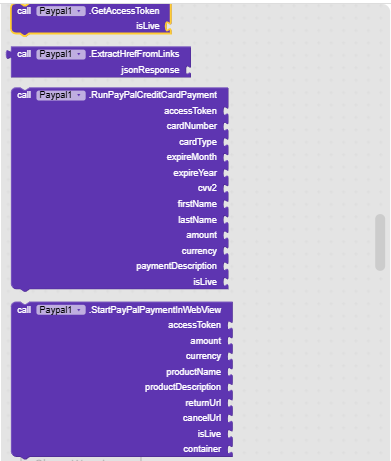

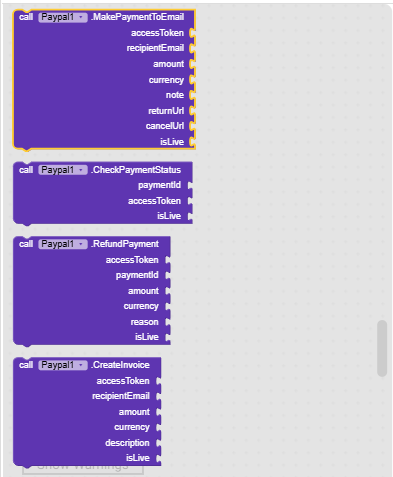
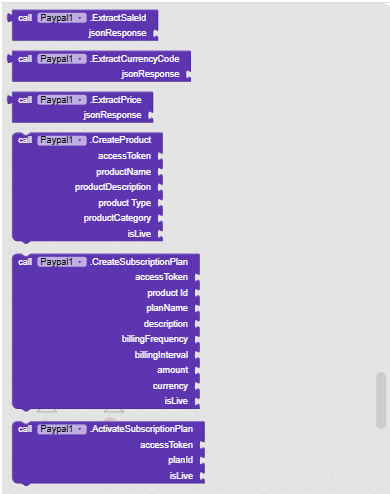
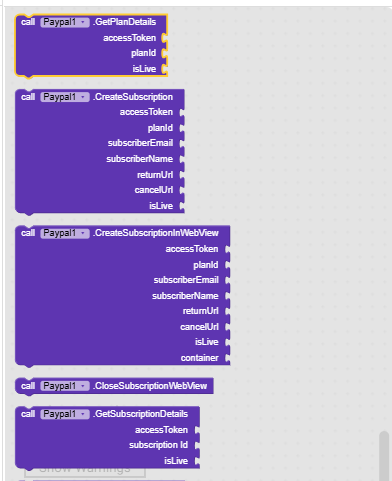
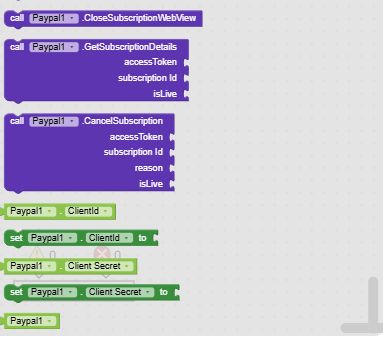
 Table of Contents
- Features
- Installation
- Quick Start
- API Reference
- Complete Workflows
- Events Reference
- Best Practices
- Troubleshooting
- Examples
- License
 Features
 One-Time Payments
- Traditional Payment Flow - Create payments with approval URL
- WebView Integration - Built-in seamless payment experience with auto-capture
- Direct Credit Card Payments - Process cards without redirect
- Payment Status Tracking - Check payment state in real-time
- Refunds - Full and partial refund support
 Subscription System
- Product & Plan Management - Create subscription products and billing plans
- Flexible Billing - Daily, weekly, monthly, or yearly cycles
- Customer Subscriptions - Easy subscription creation and management
- Status Monitoring - Track active, cancelled, suspended subscriptions
- Cancellation - Cancel subscriptions programmatically
 Additional Features
- Email Payments - Send money to PayPal email addresses
- Invoice Creation - Generate and send invoices
- Payment Extraction - Parse payment IDs, payer IDs, amounts, currencies
- Multi-Environment - Sandbox and Live mode support
 Installation
Step 1: Download Extension
Download the latest .aix file from the releases page or build from source using Rush.
Step 2: Import toKodular
- Open your MIT Kodular project
- Go to Extensions → Import Extension
- Choose the downloaded
.aixfile - The PayPal extension will appear in your palette
Step 3: Add to Your Screen
Drag the PayPal component from the Extensions section to your screen (non-visible component).
 Quick Start
Get Your PayPal API Credentials
- Go to PayPal Developer Dashboard
- Create a Sandbox account for testing
- Create an app to get your Client ID and Client Secret
Basic Payment Example
// Screen Initialize
When Screen1.Initialize:
  Set PayPal1.ClientId to "YOUR_CLIENT_ID"
  Set PayPal1.ClientSecret to "YOUR_CLIENT_SECRET"
  Call PayPal1.GetAccessToken(isLive = false)

// When token is obtained
When PayPal1.AccessTokenObtained(accessToken, appId, expiresIn, respondCode):
  Set global token to accessToken
  // Now you can make payments!

// Make a payment
When btnPay.Click:
  Call PayPal1.MakePayPalPayment(
    accessToken = global token,
    amount = 50.00,
    currency = "USD",
    productName = "Premium Subscription",
    productDescription = "1 month access",
    returnUrl = "https://example.com/success",
    cancelUrl = "https://example.com/cancel",
    isLive = false
  )

// Payment created
When PayPal1.PaymentInfoObtained(jsonResponse):
  Set approvalUrl to PayPal1.ExtractHrefFromResponse(jsonResponse)
  // Open approvalUrl in browser or WebView
 API Reference
Authentication
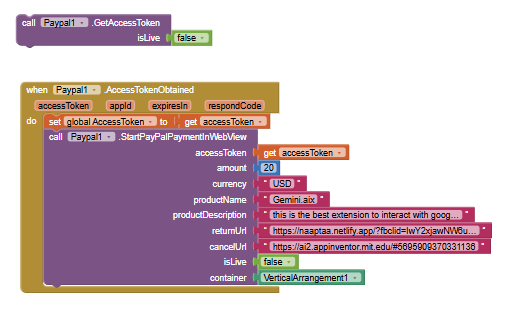
GetAccessToken(isLive: boolean)
Obtains an access token from PayPal. Must be called first before any API operations.
Parameters:
isLive-falsefor sandbox testing,truefor production
Triggers: AccessTokenObtained event
Example:
Call PayPal1.GetAccessToken(isLive = false)
One-Time Payments
MakePayPalPayment(...)
Creates a PayPal payment and returns approval URL for traditional flow.
Parameters:
accessToken- Valid access token fromGetAccessTokenamount- Payment amount (e.g., 29.99)currency- 3-letter currency code (USD, EUR, GBP, etc.)productName- Name of product/serviceproductDescription- DescriptionreturnUrl- Success redirect URLcancelUrl- Cancellation URLisLive- Environment mode
Triggers: PaymentInfoObtained event
Workflow:
- Call
MakePayPalPayment - Extract approval URL from response
- Redirect user to approval URL
- User approves payment
- Extract
paymentIdandPayerIDfrom return URL - Call
CaptureAmountto finalize payment
StartPayPalPaymentInWebView(...)
Recommended Method - Creates payment with built-in WebView for seamless experience. Automatically captures payment!
Parameters:
- All parameters from
MakePayPalPayment container- VerticalArrangement or HorizontalArrangement to display WebView
Triggers:
PaymentInWebViewSucceeded- Auto-captured!PaymentInWebViewCancelledPaymentInWebViewError
Example:
Call PayPal1.StartPayPalPaymentInWebView(
  accessToken = global token,
  amount = 50.00,
  currency = "USD",
  productName = "Premium Access",
  productDescription = "1 month",
  returnUrl = "https://example.com/success",
  cancelUrl = "https://example.com/cancel",
  isLive = false,
  container = VerticalArrangement1
)
CaptureAmount(paymentId, payerId, accessToken, isLive)
Captures/executes a payment after user approval. Finalizes the transaction.
Triggers: AmountCaptured event
RunPayPalCreditCardPayment(...)
Processes direct credit card payment without user redirect.
Parameters:
accessToken- Valid tokencardNumber- 16-digit card numbercardType- visa, mastercard, amex, discoverexpireMonth- 01-12expireYear- 4 digits (2025)cvv2- 3-4 digit security codefirstName- Cardholder first namelastName- Cardholder last nameamount- Payment amountcurrency- Currency codepaymentDescription- Transaction descriptionisLive- Environment mode
Triggers: CreditCardPaymentResponse event
Subscription System
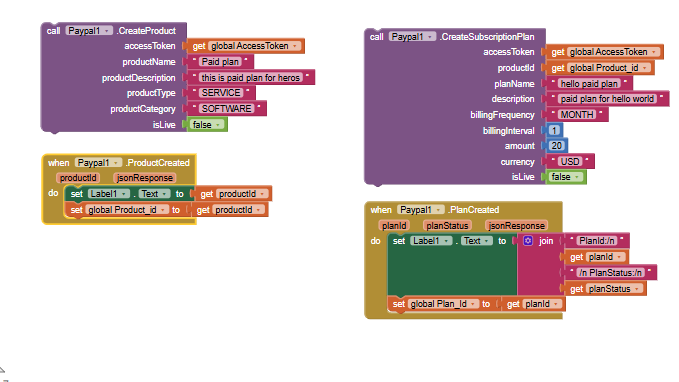
CreateProduct(accessToken, productName, productDescription, productType, productCategory, isLive)
Creates a catalog product. Required before creating subscription plans.
Parameters:
productType- SERVICE, DIGITAL, or PHYSICALproductCategory- SOFTWARE, ELECTRONICS, BOOKS, etc.
Triggers: ProductCreated event (save the productId!)
Example:
Call PayPal1.CreateProduct(
  accessToken = global token,
  productName = "Premium Membership",
  productDescription = "Access to all features",
  productType = "SERVICE",
  productCategory = "SOFTWARE",
  isLive = false
)
CreateSubscriptionPlan(...)
Creates a subscription billing plan with recurring payments.
Parameters:
accessToken- Valid tokenproductId- FromCreateProductplanName- Plan name (e.g., “Basic Monthly”)description- Plan descriptionbillingFrequency- MONTH, YEAR, WEEK, or DAYbillingInterval- Number of intervals (1 = monthly, 3 = quarterly, 12 = yearly)amount- Recurring payment amount per cyclecurrency- Currency codeisLive- Environment mode
Triggers: PlanCreated event (save the planId!)
Example:
// Monthly plan
Call PayPal1.CreateSubscriptionPlan(
  accessToken = global token,
  productId = global productId,
  planName = "Basic Monthly",
  description = "$9.99/month",
  billingFrequency = "MONTH",
  billingInterval = 1,
  amount = 9.99,
  currency = "USD",
  isLive = false
)

// Yearly plan (save money!)
Call PayPal1.CreateSubscriptionPlan(
  accessToken = global token,
  productId = global productId,
  planName = "Premium Yearly",
  description = "$99.99/year",
  billingFrequency = "YEAR",
  billingInterval = 1,
  amount = 99.99,
  currency = "USD",
  isLive = false
)
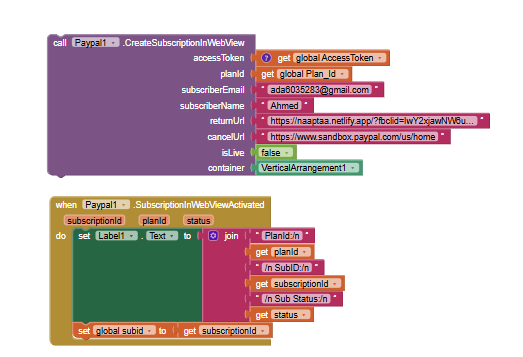
CreateSubscription(...)
Creates a subscription for a customer. Generates approval URL.
Parameters:
accessToken- Valid tokenplanId- FromCreateSubscriptionPlansubscriberEmail- Customer email (optional)subscriberName- Customer name (optional, format: “First Last”)returnUrl- Success redirect URLcancelUrl- Cancel URLisLive- Environment mode
Triggers: SubscriptionCreated event with approvalUrl
Example:
Call PayPal1.CreateSubscription(
  accessToken = global token,
  planId = global monthlyPlanId,
  subscriberEmail = txtEmail.Text,
  subscriberName = txtName.Text,
  returnUrl = "https://example.com/subscribed",
  cancelUrl = "https://example.com/cancel",
  isLive = false
)

When PayPal1.SubscriptionCreated(subscriptionId, status, approvalUrl, jsonResponse):
  // Save subscriptionId to database!
  Set global currentSubId to subscriptionId
  // Open approvalUrl for customer to approve
  Call ActivityStarter to open approvalUrl
GetSubscriptionDetails(accessToken, subscriptionId, isLive)
Retrieves subscription status and billing information.
Triggers: SubscriptionDetailsReceived event
Statuses:
APPROVAL_PENDING- Waiting for customer approvalAPPROVED- Approved but not yet activeACTIVE- Subscription is active and billingSUSPENDED- Payment issuesCANCELLED- Cancelled by user or merchantEXPIRED- Subscription expired
Example:
// Check if user has active subscription
Call PayPal1.GetSubscriptionDetails(
  accessToken = global token,
  subscriptionId = global userSubscriptionId,
  isLive = false
)

When PayPal1.SubscriptionDetailsReceived(subscriptionId, status, planId, jsonResponse):
  If status = "ACTIVE":
    // Grant premium access
    Set Screen1.BackgroundColor to green
  Else:
    // Show subscribe button
    Set btnSubscribe.Visible to true
CancelSubscription(accessToken, subscriptionId, reason, isLive)
Cancels an active subscription. Cannot be undone!
Triggers: SubscriptionCancelled event
Example:
Call PayPal1.CancelSubscription(
  accessToken = global token,
  subscriptionId = global currentSubId,
  reason = "Customer requested cancellation",
  isLive = false
)
GetPlanDetails(accessToken, planId, isLive)
Retrieves plan information including status, billing cycles, and pricing.
Triggers: PlanDetailsReceived event
Plan Statuses:
CREATED- Plan created but not activatedACTIVE- Plan is activeINACTIVE- Plan is deactivated
ActivateSubscriptionPlan(accessToken, planId, isLive)
Activates a plan that was created with CREATED status. Usually not needed as CreateSubscriptionPlan creates plans as ACTIVE by default.
Triggers: PlanActivated event
Payment Management
CheckPaymentStatus(paymentId, accessToken, isLive)
Retrieves detailed payment status and information.
Triggers: PaymentStatusReceived event
RefundPayment(accessToken, paymentId, amount, currency, reason, isLive)
Issues a full or partial refund.
Parameters:
paymentId- Sale ID (useExtractSaleIdfrom capture response)amount- Refund amount (0 for full refund)reason- Refund reason (optional)
Triggers: RefundProcessed or RefundError event
Example:
// Full refund
Call PayPal1.RefundPayment(
  accessToken = global token,
  paymentId = global saleId,
  amount = 0,
  currency = "USD",
  reason = "Customer returned product",
  isLive = false
)

// Partial refund
Call PayPal1.RefundPayment(
  accessToken = global token,
  paymentId = global saleId,
  amount = 10.00,
  currency = "USD",
  reason = "Partial refund for damaged item",
  isLive = false
)
MakePaymentToEmail(...)
Sends money to a PayPal email address.
Parameters:
recipientEmail- Recipient’s PayPal emailamount- Amount to sendnote- Payment note/description
Triggers: PaymentToEmailResponse event with approval URL
CreateInvoice(...)
Creates a PayPal invoice for a customer.
Triggers: InvoiceCreated event
Utility Functions
ExtractHrefFromResponse(jsonResponse): string
Extracts the PayPal approval URL from payment response.
ExtractPaymentIdFromUrl(url): string
Extracts payment ID from return URL after PayPal redirect.
ExtractPayerIdFromUrl(url): string
Extracts payer ID from return URL.
ExtractIdFromResponse(jsonResponse): string
Extracts payment ID from JSON response.
ExtractSaleId(jsonResponse): string
Extracts sale ID from capture response (needed for refunds).
ExtractCurrencyCode(jsonResponse): string
Extracts currency code from payment response.
ExtractPrice(jsonResponse): string
Extracts total amount from payment response.
ExtractResponseCode(jsonResponse): int
Extracts state code from response.
ClosePaymentWebView()
Manually closes the payment WebView.
Complete Workflows
 One-Time Payment (WebView - Recommended)
// Setup
When Screen1.Initialize:
  Set PayPal1.ClientId to "YOUR_CLIENT_ID"
  Set PayPal1.ClientSecret to "YOUR_CLIENT_SECRET"
  Call PayPal1.GetAccessToken(isLive = false)

When PayPal1.AccessTokenObtained(accessToken, appId, expiresIn, respondCode):
  Set global token to accessToken

// Make Payment
When btnCheckout.Click:
  Call PayPal1.StartPayPalPaymentInWebView(
    accessToken = global token,
    amount = 50.00,
    currency = "USD",
    productName = "Premium Feature",
    productDescription = "Unlock all features",
    returnUrl = "https://example.com/success",
    cancelUrl = "https://example.com/cancel",
    isLive = false,
    container = VerticalArrangement1
  )

// Success (auto-captured!)
When PayPal1.PaymentInWebViewSucceeded(paymentId, payerId):
  Show notification: "Payment successful!"
  Grant access to premium features

// Wait for final confirmation
When PayPal1.AmountCaptured(success, response):
  If success:
    Save payment to database
    Show confirmation screen
 Subscription System (Complete)
// ONE-TIME SETUP: Create Product and Plans
When btnSetup.Click:
  Call PayPal1.GetAccessToken(isLive = false)

When PayPal1.AccessTokenObtained(accessToken, appId, expiresIn, respondCode):
  Set global token to accessToken
  // Create product
  Call PayPal1.CreateProduct(
    accessToken = global token,
    productName = "Premium Membership",
    productDescription = "All features unlocked",
    productType = "SERVICE",
    productCategory = "SOFTWARE",
    isLive = false
  )

When PayPal1.ProductCreated(productId, jsonResponse):
  Set global productId to productId
  Store productId in TinyDB with tag "product_id"
  // Create monthly plan
  Call PayPal1.CreateSubscriptionPlan(
    accessToken = global token,
    productId = productId,
    planName = "Monthly Plan",
    description = "$9.99/month",
    billingFrequency = "MONTH",
    billingInterval = 1,
    amount = 9.99,
    currency = "USD",
    isLive = false
  )

When PayPal1.PlanCreated(planId, planStatus, jsonResponse):
  Set global monthlyPlanId to planId
  Store planId in TinyDB with tag "monthly_plan_id"
  Show notification: "Plans created successfully!"

// CUSTOMER SUBSCRIBES
When btnSubscribe.Click:
  Set planId to TinyDB.GetValue("monthly_plan_id")
  Call PayPal1.CreateSubscription(
    accessToken = global token,
    planId = planId,
    subscriberEmail = txtEmail.Text,
    subscriberName = txtName.Text,
    returnUrl = "https://example.com/subscribed",
    cancelUrl = "https://example.com/cancel",
    isLive = false
  )

When PayPal1.SubscriptionCreated(subscriptionId, status, approvalUrl, jsonResponse):
  Set global currentSubId to subscriptionId
  Store subscriptionId in TinyDB with tag "subscription_" + txtEmail.Text
  // Open approval URL
  Call ActivityStarter to open approvalUrl

// CHECK SUBSCRIPTION STATUS
When Screen1.Initialize:
  Set subId to TinyDB.GetValue("subscription_" + userEmail)
  If subId is not empty:
    Call PayPal1.GetSubscriptionDetails(
      accessToken = global token,
      subscriptionId = subId,
      isLive = false
    )

When PayPal1.SubscriptionDetailsReceived(subscriptionId, status, planId, jsonResponse):
  If status = "ACTIVE":
    Grant premium access
    Hide subscribe buttons
  Else:
    Show subscribe buttons
    Remove premium access

// CANCEL SUBSCRIPTION
When btnCancel.Click:
  Call PayPal1.CancelSubscription(
    accessToken = global token,
    subscriptionId = global currentSubId,
    reason = "User requested",
    isLive = false
  )

When PayPal1.SubscriptionCancelled(subscriptionId):
  Show notification: "Subscription cancelled"
  Update database
 Refund Processing
When btnRefund.Click:
  // Extract sale ID from original capture response
  Set saleId to PayPal1.ExtractSaleId(global captureResponse)

  // Full refund
  Call PayPal1.RefundPayment(
    accessToken = global token,
    paymentId = saleId,
    amount = 0,
    currency = "USD",
    reason = "Customer returned product",
    isLive = false
  )

When PayPal1.RefundProcessed(id, state, total, currency, reason):
  Show notification: "Refund of " + total + " " + currency + " processed"
  Update order status to "Refunded"
 Events Reference
Authentication Events
AccessTokenObtained(accessToken, appId, expiresIn, respondCode)
Payment Events
PaymentInfoObtained(jsonResponse)CreditCardPaymentResponse(responseCode, jsonResponse)AmountCaptured(success, response)PaymentStatusReceived(paymentId, id, intent, state, createTime, updateTime, jsonResponse)PaymentToEmailResponse(success, jsonResponse, redirectUrl)
WebView Payment Events
PaymentInWebViewSucceeded(paymentId, payerId)- Auto-captured!PaymentInWebViewCancelled()PaymentInWebViewError(errorMessage)
Subscription Events
ProductCreated(productId, jsonResponse)ProductCreationError(error, errorDescription)PlanCreated(planId, planStatus, jsonResponse)PlanCreationError(error, errorDescription)PlanActivated(planId)PlanActivationError(error, errorDescription)PlanDetailsReceived(planId, planName, status, description, jsonResponse)PlanDetailsError(error, errorDescription)SubscriptionCreated(subscriptionId, status, approvalUrl, jsonResponse)SubscriptionCreationError(error, errorDescription)SubscriptionDetailsReceived(subscriptionId, status, planId, jsonResponse)SubscriptionDetailsError(error, errorDescription)SubscriptionCancelled(subscriptionId)SubscriptionCancellationError(error, errorDescription)
Refund Events
RefundProcessed(id, state, total, currency, reason)RefundError(error, errorDescription)
Invoice Events
InvoiceCreated(success, response)
 Best Practices
1. Environment Management
// Use sandbox for testing
Set global IS_LIVE to false

// Switch to production when ready
Set global IS_LIVE to true
2. Token Management
// Access token expires in ~9 hours
// Store token and expiry time
When PayPal1.AccessTokenObtained(accessToken, appId, expiresIn, respondCode):
  Set global token to accessToken
  Set global tokenExpiry to (CurrentTime + expiresIn)

// Refresh before making API calls
Procedure CheckToken:
  If CurrentTime > global tokenExpiry - 300:  // 5 min buffer
    Call PayPal1.GetAccessToken(isLive = global IS_LIVE)
3. Error Handling
// Always handle errors
When PayPal1.PaymentInWebViewError(errorMessage):
  Show notification: errorMessage
  Log error to database
  Show retry button

When PayPal1.SubscriptionCreationError(error, errorDescription):
  If error contains "INVALID_TOKEN":
    Call PayPal1.GetAccessToken and retry
  Else:
    Show error to user
4. Data Storage
// Store critical IDs securely
- Product IDs (one-time)
- Plan IDs (one-time)
- Customer subscription IDs (per user)
- Access token (temporary, refresh regularly)

// Use Firebase or secure database for production
5. Subscription Status Checks
// Check on app launch
When Screen1.Initialize:
  CheckSubscriptionStatus()

// Periodic checks (optional)
When Clock1.Timer:  // Every 24 hours
  CheckSubscriptionStatus()
6. WebView vs Traditional Flow
// Use WebView for better UX (recommended)
Call StartPayPalPaymentInWebView(...)

// Use traditional flow if WebView not suitable
Call MakePayPalPayment(...)
// Then handle redirect manually
 Troubleshooting
Common Issues
1. “INVALID_TOKEN” Error
Cause: Access token expired or invalid
Solution:
Call PayPal1.GetAccessToken(isLive = false)
// Wait for AccessTokenObtained event, then retry
2. WebView Not Showing
Cause: Container not set correctly
Solution:
// Ensure you pass a VerticalArrangement or HorizontalArrangement
Call PayPal1.StartPayPalPaymentInWebView(
  ...
  container = VerticalArrangement1  // Make sure this exists!
)
3. Subscription Not Activating
Cause: Customer hasn’t approved yet
Solution:
// Check status after customer returns
Call PayPal1.GetSubscriptionDetails(...)

When SubscriptionDetailsReceived(..., status, ...):
  If status = "APPROVAL_PENDING":
    Show message: "Please complete payment approval"
  Else If status = "ACTIVE":
    Grant access
4. “Product not found” When Creating Plan
Cause: Invalid product ID
Solution:
// Ensure you saved and are using the correct product ID
When PayPal1.ProductCreated(productId, jsonResponse):
  Store productId in TinyDB  // Don't lose this!
5. Refund Fails
Cause: Using payment ID instead of sale ID
Solution:
// Extract sale ID from capture response first
Set saleId to PayPal1.ExtractSaleId(captureResponse)
Call PayPal1.RefundPayment(paymentId = saleId, ...)
 Examples
Example 1: Simple Donation App
// User enters donation amount
When btnDonate.Click:
  Call PayPal1.StartPayPalPaymentInWebView(
    accessToken = global token,
    amount = txtAmount.Text,
    currency = "USD",
    productName = "Donation",
    productDescription = "Support our cause",
    returnUrl = "https://example.com/thanks",
    cancelUrl = "https://example.com/cancel",
    isLive = false,
    container = VerticalArrangement1
  )

When PayPal1.PaymentInWebViewSucceeded(paymentId, payerId):
  Show notification: "Thank you for your donation!"
  Send thank you email
Example 2: Premium Feature Unlock
// User buys premium feature
When btnUnlockPremium.Click:
  Call PayPal1.StartPayPalPaymentInWebView(
    accessToken = global token,
    amount = 4.99,
    currency = "USD",
    productName = "Premium Features",
    productDescription = "Unlock all premium features",
    returnUrl = "https://example.com/success",
    cancelUrl = "https://example.com/cancel",
    isLive = false,
    container = WebViewContainer
  )

When PayPal1.AmountCaptured(success, response):
  If success:
    Store "premium" = true in TinyDB
    Reload screen with premium features enabled
Example 3: Netflix-Style Subscription
// Monthly and Yearly plans
When btnMonthly.Click:
  Set selectedPlan to TinyDB.GetValue("monthly_plan_id")
  SubscribeUser(selectedPlan)

When btnYearly.Click:
  Set selectedPlan to TinyDB.GetValue("yearly_plan_id")
  SubscribeUser(selectedPlan)

Procedure SubscribeUser(planId):
  Call PayPal1.CreateSubscription(
    accessToken = global token,
    planId = planId,
    subscriberEmail = txtEmail.Text,
    subscriberName = txtName.Text,
    returnUrl = "myapp://subscribed",
    cancelUrl = "myapp://cancel",
    isLive = false
  )

// After subscription
When SubscriptionCreated(...):
  Navigate to content screen
  Show premium content
 Security Considerations
- Never hardcode credentials - Use environment variables or secure storage
- Validate on server-side - Don’t trust client-side subscription checks alone
- Use HTTPS - Always use secure URLs for return/cancel URLs
- Test in sandbox first - Never test with real money
- Handle webhooks (advanced) - Use PayPal webhooks for real-time updates
- Store sensitive data securely - Use Firebase or encrypted storage
 Going Live
Before Production:
 Test thoroughly in sandbox mode
- Create production PayPal app credentials
- Update
ClientIdandClientSecretto production values - Change all
isLive = falsetoisLive = true - Update return/cancel URLs to production URLs
- Set up proper error logging
- Implement server-side validation (recommended)
- Set up PayPal webhooks for automatic updates

Remember:
-
You’ll need to obtain your PayPal client ID and client secret from the PayPal Developer Dashboard.
-
Carefully review PayPal’s API documentation for specific requirements and limitations of each API call.
I hope this explanation helps you understand and use the PayPal Extension effectively in your App Inventor projects!
Preview_Video:
Test
Preview image
successful payment in live mode

Extension:
you will get aix file in addition to aia file that contains methods of installing the extension inside your project
You can buy it via PayPal it costs 8$ instead of 12$ after your payment you will be directed to the download URL of the zip file that contains aix and aia file of the extension . This offer valid for a limited duration
© 2023 MrKoder. All rights reserved.
For inquiries, please contact: Mr koder
Visit our YouTube channel: Mr Koder’s YouTube Channel

