Hi everyone ![]() ,
,
Today I want to share with you SupabaseCRUDQ, a project I’ve been meaning to finish for a long time.
Since Supabase Docs aren’t always very clear, I had set it aside for more interesting projects ![]() .
.
Here we will cover Create, Read, Update, Delete, and Query with email authentication through Web component, and at the end of the guide there’s also an attempt at implementing a realtime database.
 Variables
![]()
![]() authDetails: In response to our successful login, we’ll receive a JSON containing various user information,
authDetails: In response to our successful login, we’ll receive a JSON containing various user information,
{
	"id": "",
	"aud": "",
	"role": "",
	"email": "",
	"phone": "",
	"confirmation_sent_at": "",
	"app_metadata": {
		"provider": "",
		"providers": []
	},
	"user_metadata": {},
	"identities": [],
	"created_at": "",
	"updated_at": "",
	"is_anonymous":
}
and we’ll save it in this variable.

For example,
=→eq>→gt!→is.null
…and many others.
![]()
![]() function: It is used to keep track of the last function called, so that we know what a Supabase response refers to.
function: It is used to keep track of the last function called, so that we know what a Supabase response refers to.
(There’s probably a smarter way to do it, but this is how I did it)
![]()
![]() SupabaseURL: URL of the Supabase project.
SupabaseURL: URL of the Supabase project.
https://YOUR_SUPABASE_ID.supabase.co
![]()
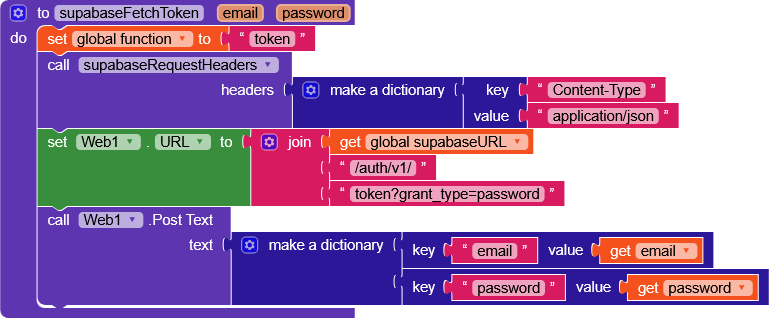
![]() tokenDetails: Right after logging in, in
tokenDetails: Right after logging in, in Web.GotText we run the supabaseFetchToken function, which will request a token(access_token) from Supabase to perform operations securely.
The response will contain:
{
	"access_token": "",
	"token_type": "",
	"expires_in": 3600 ,
	"expires_at":  ,
	"refresh_token": "",
	"user": {
		"id": "",
		"aud": "",
		"role": "",
		"email": "",
		"email_confirmed_at": "",
		"phone": "",
		"confirmation_sent_at": "",
		"confirmed_at": "",
		"last_sign_in_at": "",
		"app_metadata": {
			"provider": ,
			"providers": []
		},
		"user_metadata": {
			"email": "",
			"email_verified": ,
			"phone_verified": ,
			"sub": ""
		},
		"identities": [
			{
				"identity_id": "",
				"id": "",
				"user_id": "",
				"identity_data": {
					"email": "",
					"email_verified": ,
					"phone_verified": ,
					"sub": ""
				},
				"provider": "",
				"last_sign_in_at": "",
				"created_at": "",
				"updated_at": "",
				"email": ""
			}
		],
		"created_at": "",
		"updated_at": "",
		"is_anonymous":
	}
}
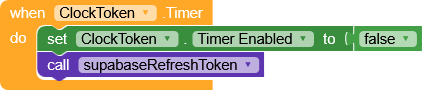
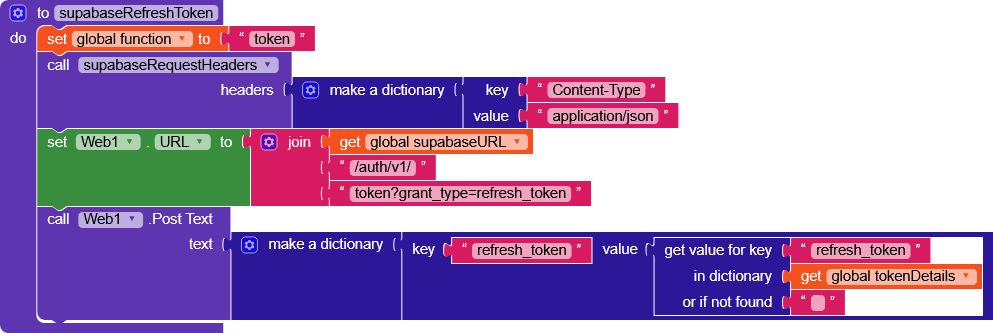
As can be seen from the JSON "expires_in": 3600, the token has a duration of 1 hour.
1 hour = 3600 seconds = 3600000 milliseconds
To refresh the token, I added a ClockToken that runs the supabaseRefreshToken function every hour.
![]()
 Headers

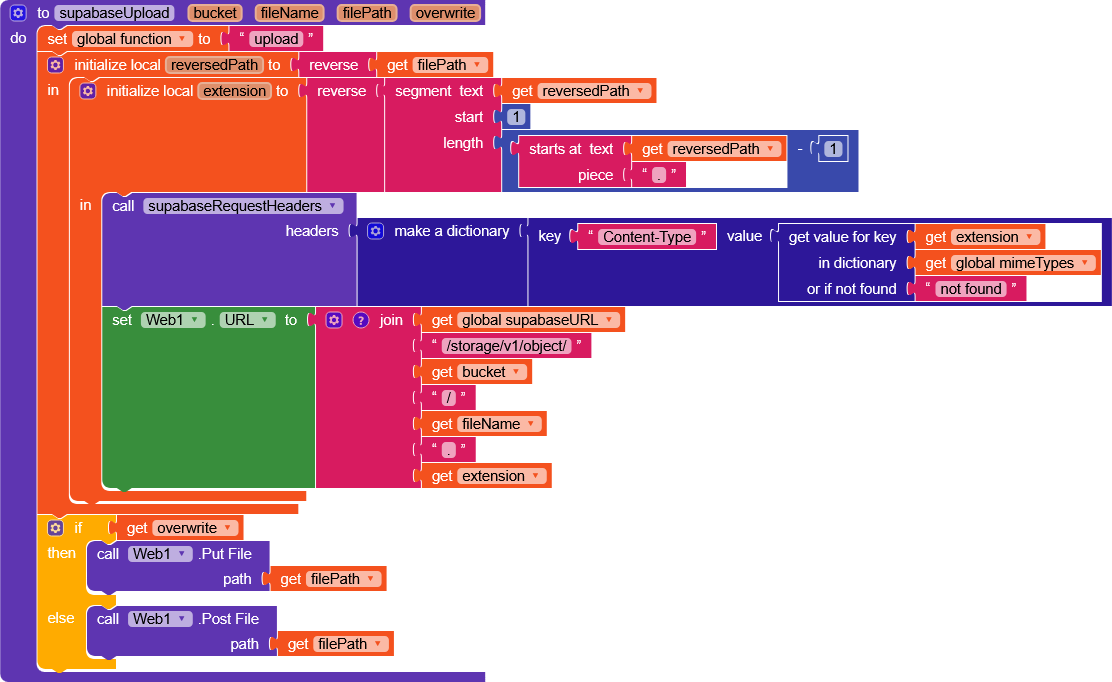
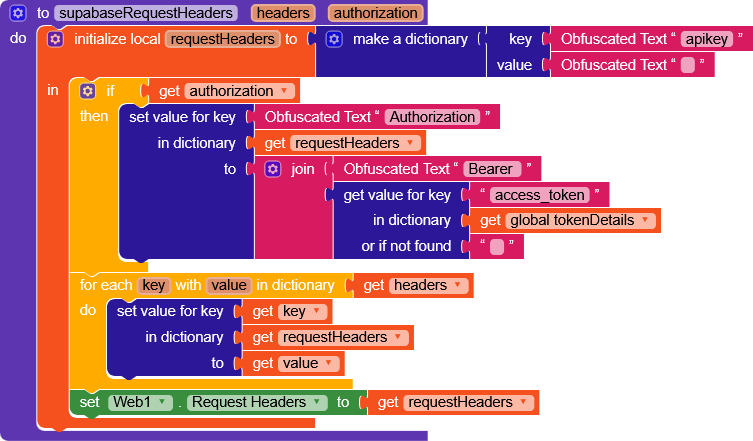
In this project, the headers of the requests we make will be managed with a function called supabaseRequestHeaders.
Inside it, there’s a “fixed” variable requestHeaders containing apikey and accessToken, which are required for every request.
It’s possible to pass a dictionary to the function if we want to add additional headers.

Remember to set the apikey to ANON_KEY or PUBLISHABLE_KEY
 CRUQD
CRUQD
All functions follow the same block schema:
- Setting up the function variable
- Configuring the headers
- Setting the URL
- Sending the request with an HTTP method
Since there’s not much to explain beyond using these blocks, I won’t add many details to the images but feel free to ask in the comments for more explanations.
Signup
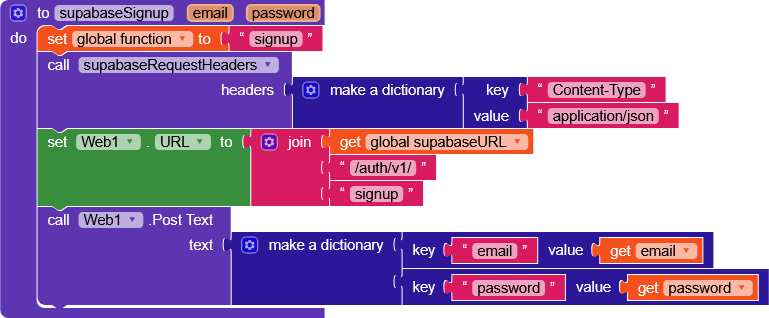
| Parameter | Description |
|---|---|
| user email | |
| password | user password |
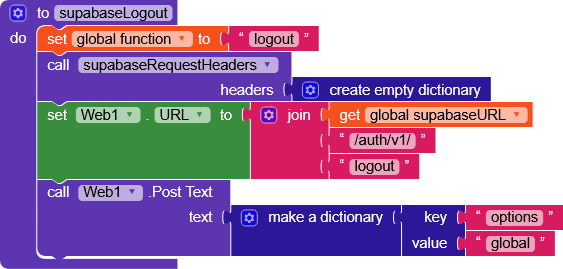
Logout
FetchToken
| Parameter | Description |
|---|---|
| user email | |
| password | user password |
RefreshToken
Create
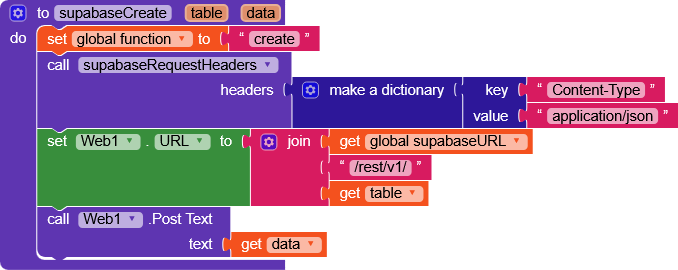
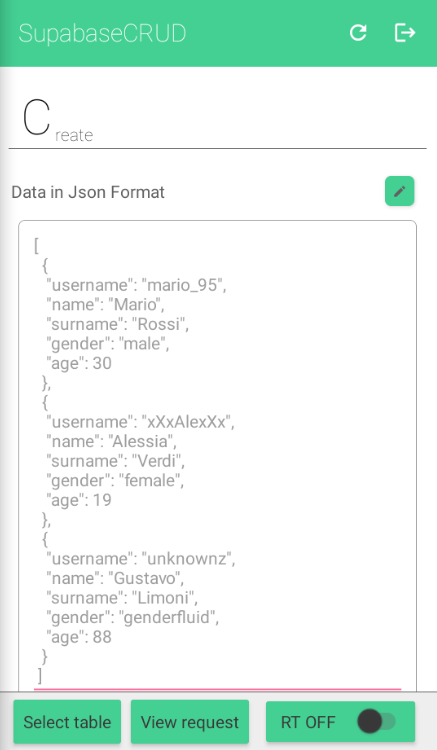
If you need to add multiple rows, you’ll have to create a list containing dictionaries.
Use the
encodeListToJsonList function to encode the list into JSON.
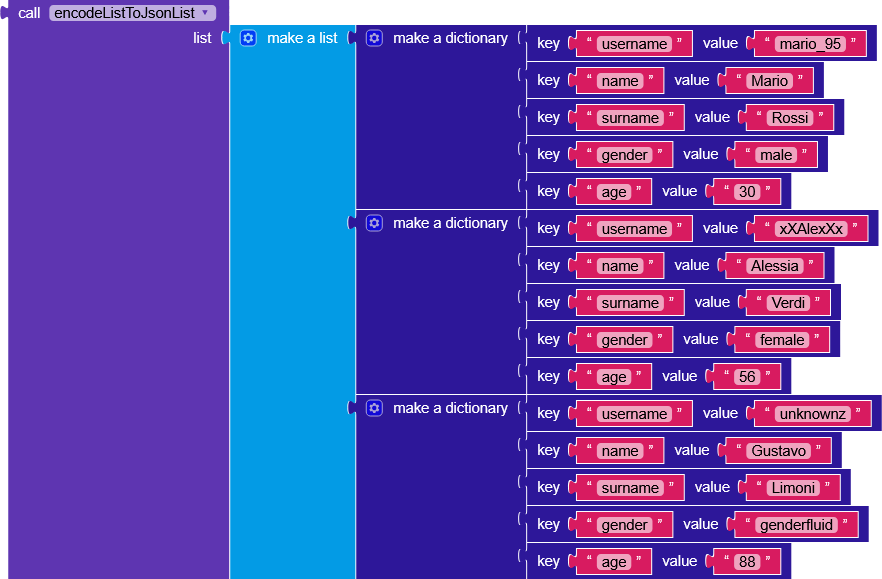
| Parameter | Description |
|---|---|
| table | table on which to perform the operation |
| data | data to be sent |
ReadColumn & ReadTable
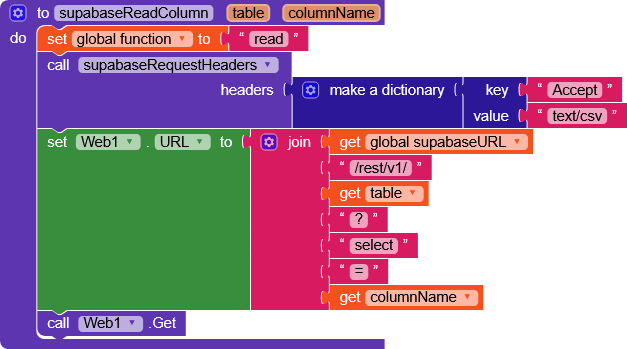
| Parameter | Description |
|---|---|
| table | table on which to perform the operation |
| columnName | column that needs to be read |
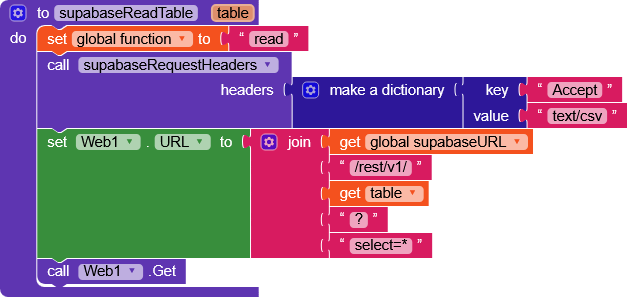
| Parameter | Description |
|---|---|
| table | table on which to perform the operation |
Update
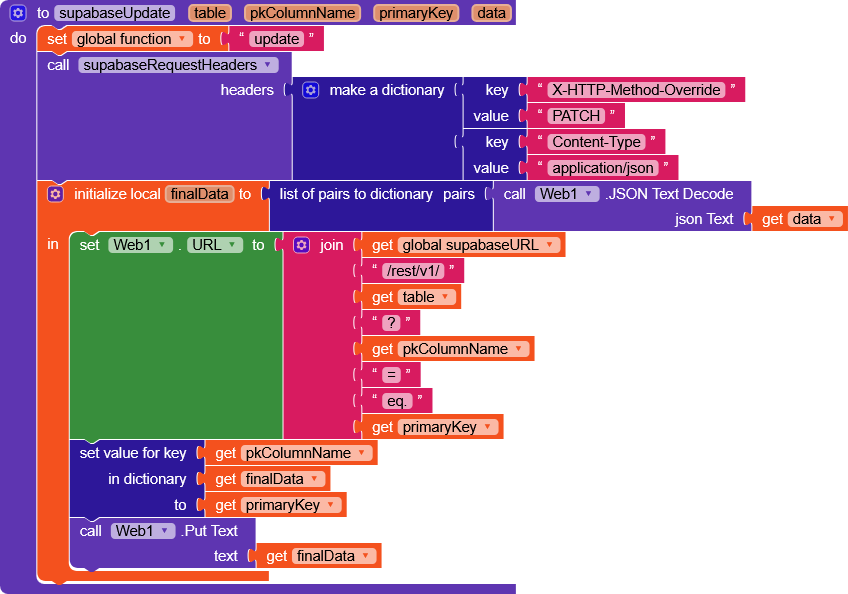
The variable
finalData automatically adds a pair of primaryColumnName and primaryKey to our data by copying them from the function’s parameters (required to execute the operation correctly).
| Parameter | Description |
|---|---|
| table | table on which to perform the operation |
| pkColumnName | primary key column name |
| primaryKey | primary key value |
| Data | the data that will replace the selected ones |
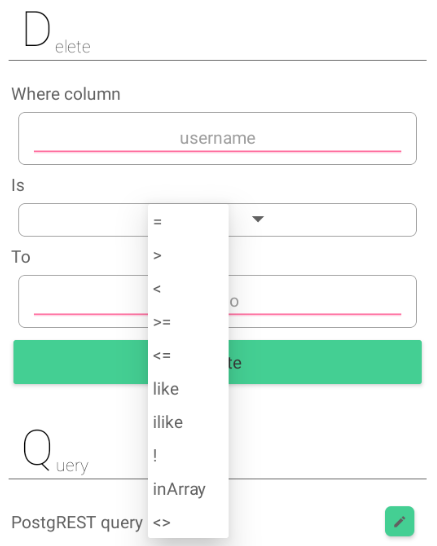
Delete
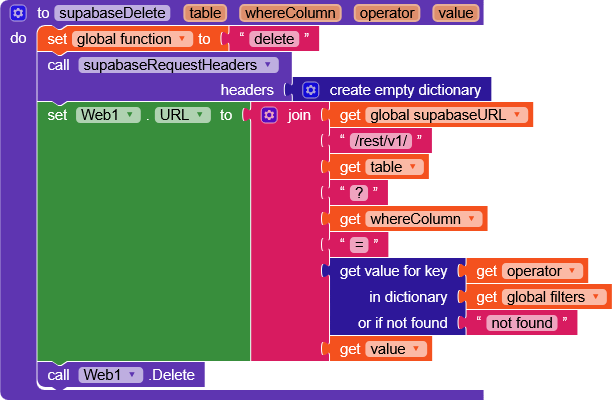
| Parameter | Description |
|---|---|
| table | table on which to perform the operation |
| whereColumn | column name |
| operator | an operator to select the data |
| value | the data that will replace the selected ones |
Query
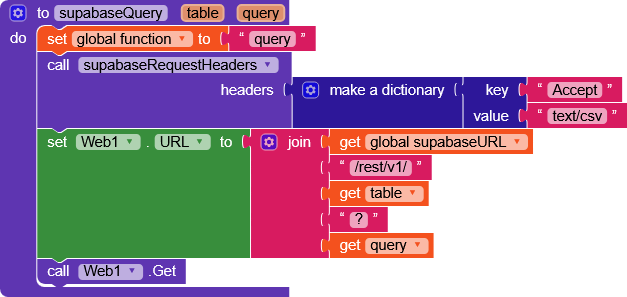
| Parameter | Description |
|---|---|
| table | table on which to perform the operation |
| query | PostgREST query |
GetUUID
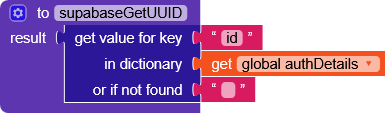
Returns the user’s
ID
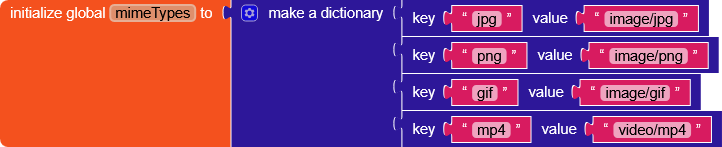
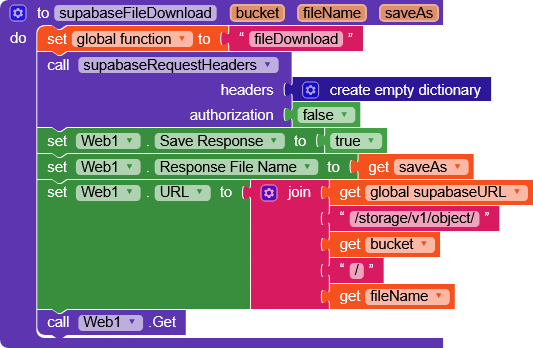
Upload file
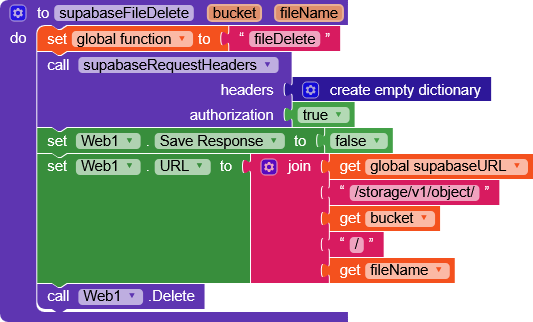
Delete file
Download file
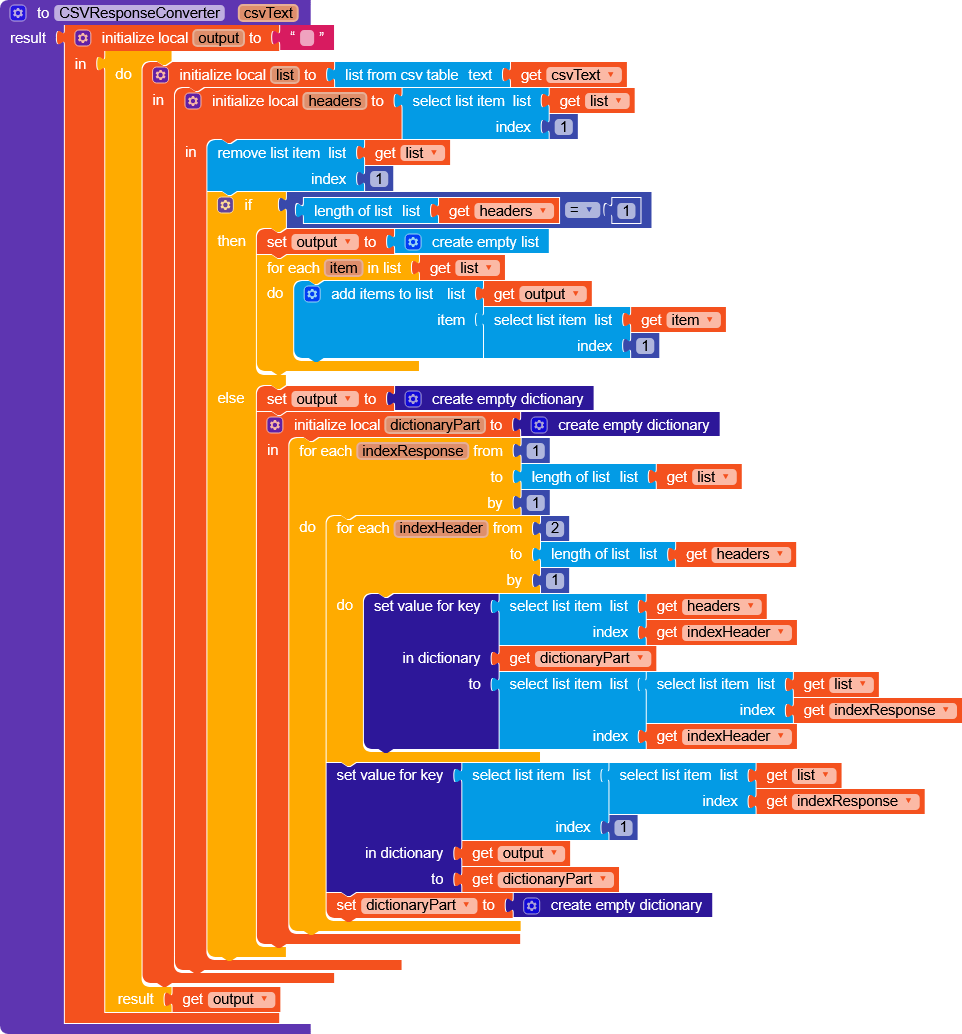
 Web.GotText

Here we handle all the responses we get from Supabase.
The responses are first filtered through responseCode and then further filtered using the value of the function variable.
- In case of a positive response from
read/query, we useCSVResponseConverterfunction, if you noticed, in these two functions (1 - 2) the header includedAccept:text/csv, which asks Supabase to return a response inCSV(the JSON caused issues).
I created a guide explaining howCSVToDictionaryworks this one is a slightly modified version to get a list in the case ofreadColumn(here too, Supabase caused issues with the JSON ) and a dictionary in the case of
 readTable.
 Realtime Database
First of all, we thank
imwsummit for the WebSocketConnector extension, which allow us to receive realtime messages from the database.
[FREE] WebSocket Connector - An Extension for connecting and communicating with web sockets
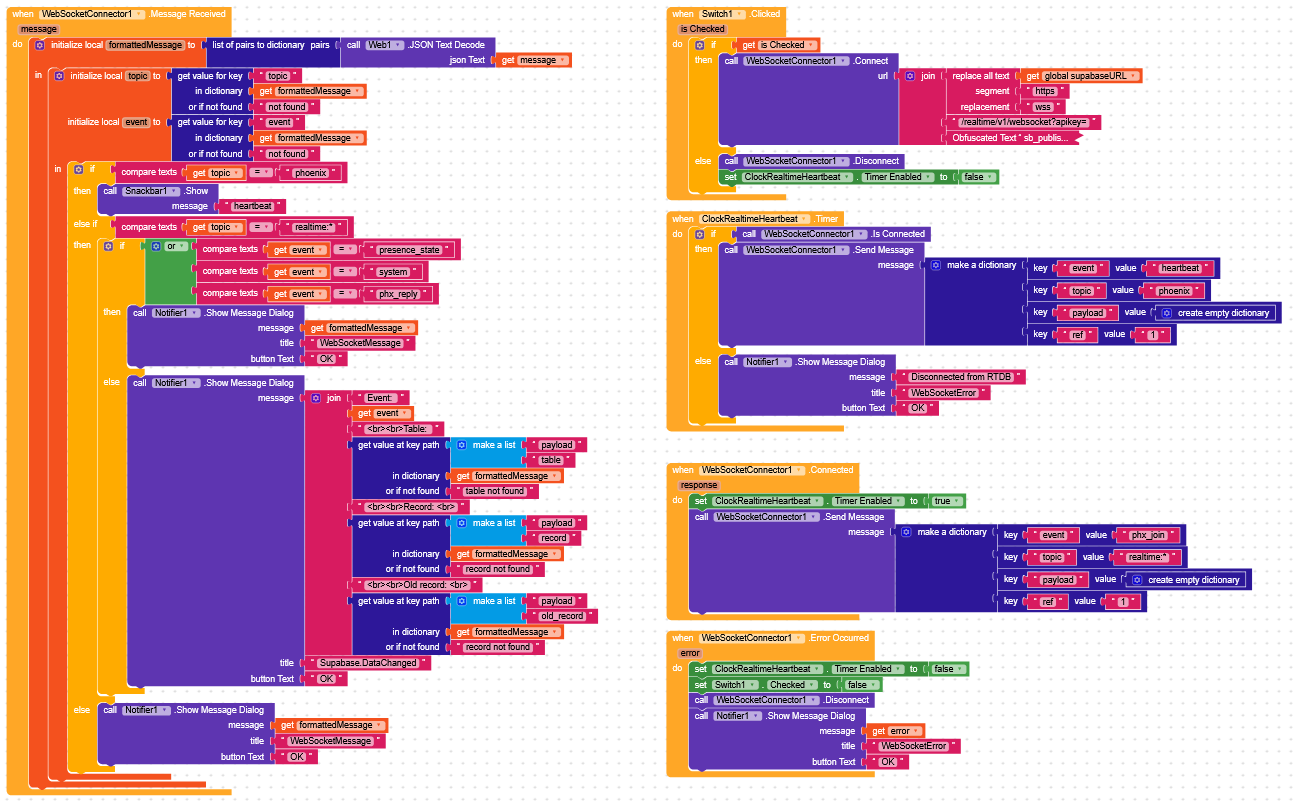
Here you can clearly see why I called it an attempt, this is what I managed to do, it works, but I feel it’s not perfect…
As with the rest of the project, I’ll only explain the essential blocks.
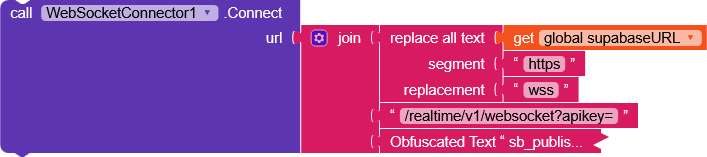
First, we connect to the RTDB.
wss://YOUR_SUPABASE_ID.supabase.co/realtime/v1/websocket?apikey=PUBLISHABLE_KEY/ANON_KEY

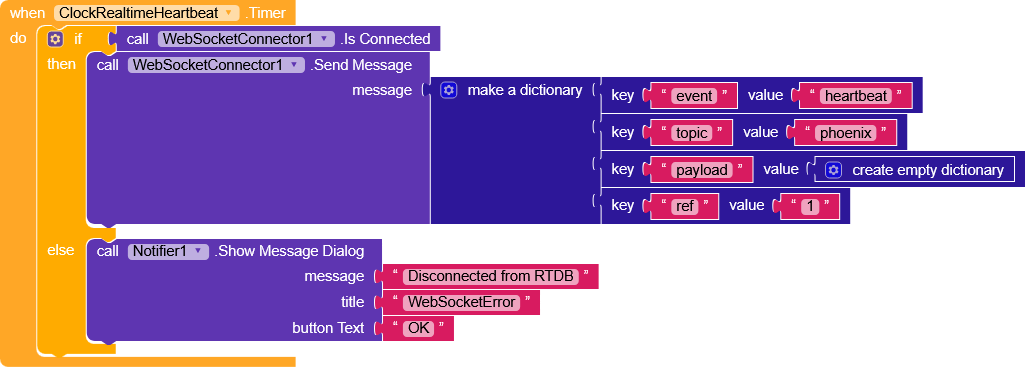
Next, we send a join message with the table we want to monitor, in this case, all tables realtime:*.
(The ref should be incremented with each message, but in this guide we’ll keep it fixed at 1 since we don’t need it).
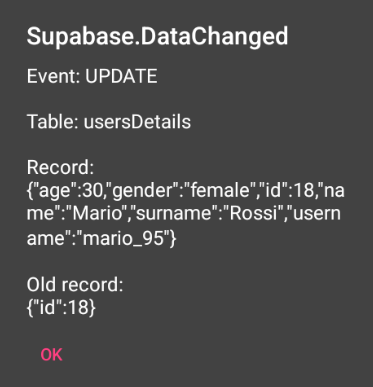
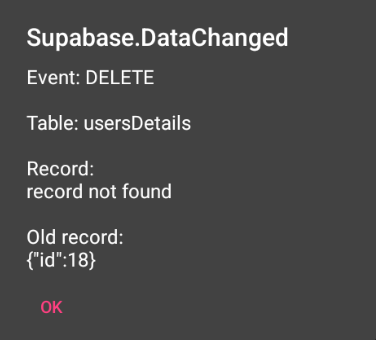
After performing these operations, any change made in the database will return a message indicating what happened.
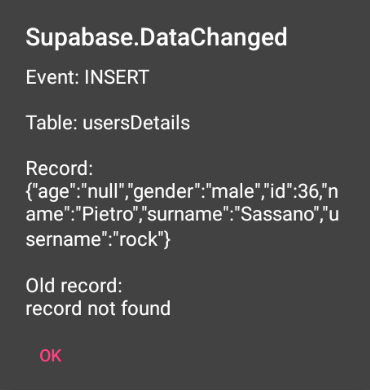
The socket is kept alive through aheartbeat, a message sent every 30 seconds to tell Supabase that we don’t want to close the connection.
Test AIA
This project is for testing your own database, just enter your Supabase project URL and immediately see if everything works correctly.
I created simple layouts to test all the functions.
SupabaseCRUD.aia (437.6 KB)
Essential AIA
This project contains only the essential blocks to make everything work, without any graphics.
SupabaseCRUD.aia (427.2 KB)
To avoid a wall of text, I wrote only what seemed most important, but there’s really much more to say.
Don’t hesitate to ask for further explanations.
Happy ![]() oding!
oding!